The State of My Homelab 2023
It’s been almost seven years since I started self-hosting. This became a hobby of mine from the beginning and I found myself dedicating a lot of my afternoons (and whole days) to experiment with new technologies, hardware configurations, networking, automation, and many many more things. I never took the chance to talk about this in my blog, so now I want to finally open up and give you a glimpse into my homelab setup, sharing what I’ve been using, hosting and what are some of my thoughts about the future. I will present my setup using the layers (as many as they make sense) of the OSI model as an analogy, adjusted to presenting my homelab.
Layer 1 - Physical layer⌗
As I initially said, I have been into this hobby since 2016 and my setup has seen a lot of changes through the years. From a couple of VMs in Scaleway at first, which served my mini CV and my first blog post and were the authoritative DNS servers for my domain to multiple VMs in multiple providers to a couple of Ryzen PCs that were my experimental k3s cluster in my living room. Since the price hikes of electricity, I have scaled down significantly and adopted a minimalist approach for the machines running in my house, aiming for a maximum of 100W total for the machines that are up and running 24/7.
Of course, we can’t begin talking about hardware and servers without defining the naming scheme that it is followed for naming the machines. Personally, I’m naming my servers using city names. My convention is simple. Greek city names for all instances that are located inside my premises and European city names for virtual machines hosted in cloud providers. Usually the population of the city shows the size of the machine or its compute power, or, sometimes, it’s just randomly picked.
So, in my newly acquired mini rack (a local internet cafe that was closing was going to throw it away so I got it for free) you will find
- Larissa, a small form factor computer with an Intel i5-9500 and 46GB of RAM
- Amorgos, a bigger size computer with a J5040 (an Intel Pentium processor) on an ASRock motherboard and 16GB of RAM
- A cluster of 4 Raspberry Pis 4 that all got names from the Epirus region (3 of the 4GB model and 1 of the 8GB)
- Patra, an ultra small form factor Lenovo computer with the Intel i5-7500T and 8GB of RAM (with the plan to upgrade the RAM to 32GB or 64GB)
and finally,
- Anafi, a Raspberry Pi Zero 2W
I use the Mikrotik hAP ac³ as my primary router and the switch that connect all these machines is an old CRS125-24G-1S-RM I found used for a good price.
Finally, although not inside the rack, the access point that provides WiFi to all devices in the house is an Ubiquiti AP AC PRO
Layer 2 - Data Link layer⌗
I’ll take advantage of the Data in the title of this layer and describe the storage each server has, how data is stored in each server and, of course, how I perform my backups.
- Larissa has one 4TB HDD, and 2 500GB SSDs (one NVMe and the other a 2.5inch SATA) with all of them formatted using the ZFS filesystem
- Amorgos has 2 4TB HDDs, again using ZFS.
- The Raspberry Pis have attached a 250GB disk each, using a UGREEN SATA to USB3 adapter that supports UASP for faster speeds and less CPU overhead , except for Anafi which has a 32GB SD Card.
and Patra currently has a 500GB SATA SSD with an empty NVM.e slot waiting to be filled.
As you can tell, I’m a big fan of the ZFS filesystem. Since I discovered ZFS I’ve been using it everywhere I can. I store all my personal data (Photos, Videos, and Documents) in disks that are using ZFS. I like that it uses checksum to check if the data on a block of a disk doesn’t have the data that it is supposed to have and will try to fix it, if possible. This way, you can be sure that when you request a file from your disk you will either get it or won’t get an answer at all. Moreover, you know that your data aren’t going bad when you aren’t using the drive, a phenomenon called Bit rot Also, I find its snapshot capabilities amazing and it has saved me a couple of times when I accidentally deleted data that I shouldn’t. I’ve given a shot to BTRFS but I decided to stick to ZFS because I preferred the CLI tools of ZFS (probably because I experimented with it first). I’m using BTRFS though on a Linux desktop I have and it seems it is working nicely, but I don’t think I’ll migrate my server workloads to BTRFS any time soon.
But what am I doing with this storage? Larissa and Patra are servers that are running applications and serve requests from users, and so are the Raspberry Pis. On the other hand, Amorgos is my backup machine, responsible for ensuring the safety and redundancy of my data, preserving it for those just in case moments. It has 2 4TB disks in RAID 1 (or more accurately for ZFS, MIRROR) configuration of availability and file consistency (allowing checksum errors in one disk to be fixed from the other disk). Both disks were bought from different stores and I paid attention to having a couple of months difference in their manufacturing date to avoid any issues that relate to potential batch-related defects that might affect both drives simultaneously.
Another reason I like ZFS is its snapshot functionality, allowing for replication of snapshots between different storage devices. When you want to send a snapshot from one device to another, ZFS will see what blocks of data are missing or changed and replicate only these, instead of checking and copying the whole snapshot every time you want to perform a replication. This allows us to make efficient and quick backups and also keep point-in-time copies of the data in both devices.
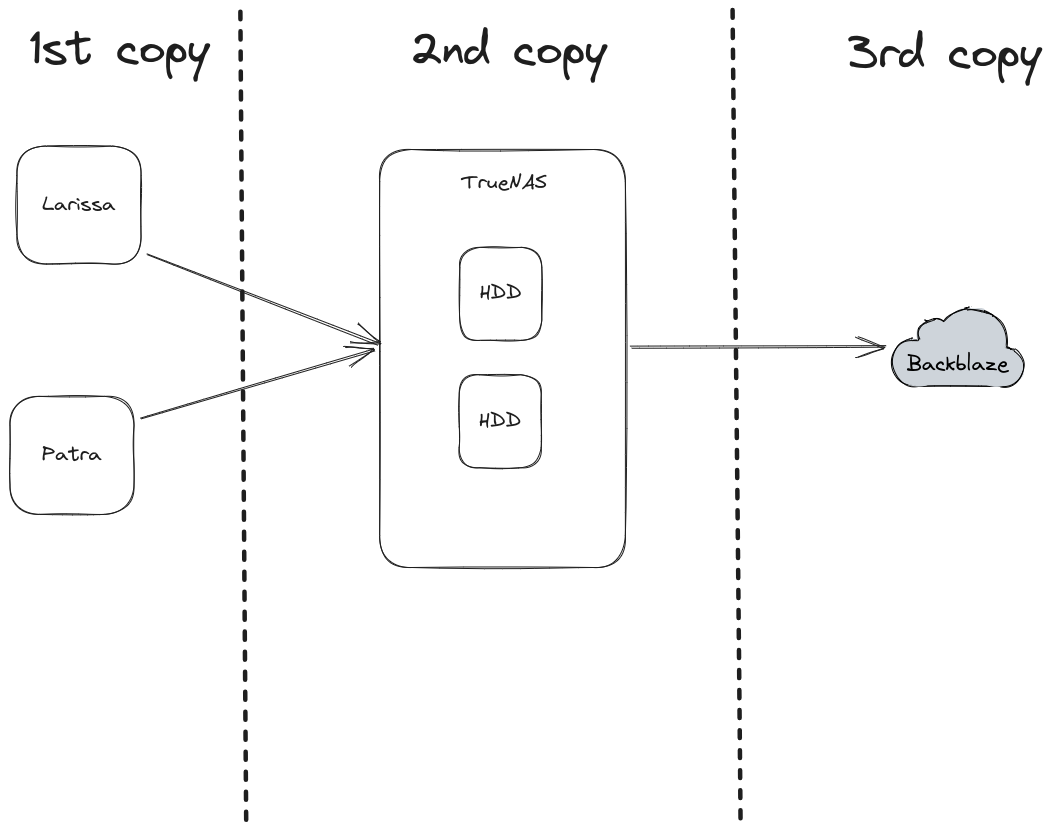
Larissa and Patra are performing a snapshot each hour and keep these snapshots for 2 weeks. This is automated using zettarepl, the tool TrueNAS uses internally. Amorgos is responsible for connecting to both Larissa and Patra, and fetching their latest snapshots (and any snapshot that it doesn’t have). This allows me to have 2 replicas of my data, both quickly and easily accessible. To cover the case of a catastrophic failure in my house (a fire, lightning that managed to corrupt or completely destroy all of my disk, or just pure bad luck), Amorgos is also responsible for syncing the latest state of the data to B2 (the object storage offered by Backblaze). By doing that, I always have a copy of my data in an environment completely separated from my house that I can use as a last resort to recover my lost data if needed.
Once every three months, I restore a snapshot from Amorgos and inspect a couple of family photos and videos to ensure that my backups are performed correctly. I’m follow the same practice with my remote backup. While I could automate this process with a script that restores a snapshot and verifies the checksum of 5 specified files in both locations, I view it as an opportunity to revisit valuable memories.
Here is a diagram of my backup strategy
Layer 3 - Network layer⌗
Now, let’s explore the network and connectivity components that make sure my devices and services can talk to each other and share data smoothly. As I said earlier, I’m using a Mikrotik hAP ac³, currently running the latest RouterOS 6 version. Mikrotik routers provide a lot of features that are expected in more expensive lines of other router manufacturers and enable you to have advanced network capabilities at an affordable price. Almost every device of my homelab (except Anafi, the RPi Zero 2W) are connected to the Mikrotik switch, which is, in turn, it is connected to the router. I segregated my network in multiple subnets to better accommodate different kind of users and devices, ensuring security and proper access control in many cases. The main subnets are
- The administrative subnet, a small subnet that I’m the only one having access to. The very first rule in the firewall of the router allows access everywhere from this subnet. This has the added benefit of ensuring that I’ll never lock myself out of the router in case I add a not-so-well-thought firewall rule.
- The private subnet, a bigger subnet for people that I trust. This includes my significant other, my family and close friends. The have access to user-facing services that might not support authentication or to devices in the network that are considered sensitive such as the printer or Apple TV. However, they are restricted though from accessing administrative panels of devices and services.
- The guests subnet, for the rest of my social circle. They are granted access solely to the internet, and are restricted from accessing the rest of my network. They can access internal services if those services have been exposed to the internet.
- The IoT subnet, which is dedicated to our smart home gadgets and devices we own, such as our washing machine, smart sensors around the house, a couple of wireless cameras and our smart plugs. It is a more restricted network than the guests network we discussed earlier. This is because the majority of the devices, such as our cameras, are not permitted internet access, for security and privacy issues. Incoming traffic is allowed from the administrative subnet and the servers subnet, making interactive with the devices possible only by using integrations that run locally.
- The servers subnet, a subnet dedicated to machines (virtual or not) that are serving content and services to users. Here, port filtering is considered on a case-by-case basis, but most of the time it is performed used application configuration rather that firewall rules.
To expose these networks to my wired and wireless devices and to be able to use the same switch for all of them, I am using VLANs. VLAN helps separate a physical network into multiple virtual ones, without requiring multiple sets of cabling and network devices. This means that my router and my switch are connected using a single cable. Through this cable, each packet is tagged with a special header indicating its associated network. The router, the switch and the UniFi Access Point support VLANs.
I have also a router and a couple of Raspberry Pis in my mother’s house. I’ve joined those two separate networks using a tunnel between the routers, using L2TP. In the future, when I’ll upgrade to RouterOS 7 on my main router, I’ll switch to Wireguard, a more modern and secure tunneling protocol.
Finally, there is another router, hosted on Linode, that all my cloud virtual machines use to gain access to my internal network. They establish a connection with the router using Wireguard. In some cases, I’m connecting instances directly when latency can be improved significantly and matters for my use case. Also, this router acts as a failover and an alternative path in case the connection between the two houses fails.
All these routers use BGP to advertise to each other routing information, allowing my routers to pick the shortest path (not in terms of the latency between the source and the destination but in the total number of routers the packet needs to cross) between nodes and quickly react to topology changes (when a link goes down for example).
Layer 4 - Transport layer⌗
In this layer we will explore the heart of the homelab’s operation and its core services.
Currently, every non-ARM machine has Proxmox, a hypervisor, installed (except Amorgos). This allows me the create multiple, isolated environments, either as virtual machines or as LXC containers. So I can deploy services or experiment with anything new I want to try leaving the host machine unaffected. For example, if I want to give BTRFS a try and experiment with its snapshots, RAID configurations and data backup (it also supports send/receive at the block level, just as ZFS), I can easily spin up one or two virtual machines with a couple of virtual disks attached. When I’m done, I can easily delete both the machines and the disks and be confident that I didn’t affect the host machine by accident in any way.
Although Proxmox supports it, the hypervisors are not clustered for simplicity reasons. If I acquire a third node, I might experiment with the built-in CEPH functionality and the clustering capabilities of Proxmox.
The majority of services that run 24/7 are located in Larissa. Within it, an LXC container is responsible for running all Docker containers. Among services hosted there, two major ones are Traefik and Authelia.
Traefik⌗
Traefik is a reverse proxy that natively supports service discovery alongside with static config. This means that any newly added service, when appropriately labeled with the domain and the port where traffic should be proxied, will be automatically added to Traefik and made accessible without any restart or reloading. Additionally, it can automatically obtain certificates from Let’s Encrypt. By using TLS and HTTPS, all traffic between users and Traefik is encrypted and features essential for modern browsers, as they often require HTTPS for full functionality, including location services, are enabled.
Authelia⌗
Authelia is an authentication and authorisation server. This allows me to secure applications that lack built-in authentication mechanisms. By leveraging Authelia, I can restrict access to them, ensuring that only authorized users can use them. Moreover, for applications that support authentication via HTTP Headers, Authelia can serve this header and act as a central point for managing user authentication and authorization policies. This approach, allows me to create users in the Authelia environment, specify which applications (domains) they can access, simplifying user management and ensuring consistent authorization across multiple applications.
Combining Traefik and Authelia⌗
So, by using Traefik, containers and services in my homelab can get a meaningful domain instead of having to remember the hostname and the port of each service, and they get a valid TLS certificate for HTTPS. Additionally, Traefik allows for the integration Authelia as a middleware to handle user authentication and permit or deny access to resources.
TrueNAS Scale as backup target⌗
Amorgos, my local backup target runs TrueNAS Scale, a Debian-based OS for creating and managing your own file server using the ZFS filesystem. As explained previously, it only pulls data from the live data sources and takes care of replicating them to the cloud. You can easily expose datasets as Samba shares or NFS exports and run a lot of applications on it (it uses k3s under the hood) but I chose to use it strictly as a backup target.
DNS⌗
DNS plays an important role in any network, ensuring that domain names are resolved quickly and securely. To manage DNS, I’m using AdGuard Home. AdGuard Home not only safeguards my network from unwanted ads, trackers and well-known malware distributing websites but also offers extensive control over DNS filtering and customization. Inside my homelab, there are 2 AdGuard home instances running, one with rest of the Docker containers in Larissa and the other in Anafi. They configuration is synchronized between the instances using AdGuard Home Sync, and the instance running in Larissa is the source of truth, while Anafi is a standby instance. They both share the same IP address using keepalived, where a script in Anafi checks if the main server still responds to queries and starts the failover procedure, announcing the DNS server IP. This allows me to update, reboot and in general maintain my servers without worrying about “Is internet down?” questions :)
Monitoring⌗
With the core services and components in place, it’s essential to ensure the health and performance of my homelab. This is where monitoring comes into play. It provides me with insights into resource utilisation and other kinds of metrics, while also serving as an early warning system, notifying me when things are going wrong. For instance, it can alert me when memory usage is exceeds a certain threshold for a long period of time.
To monitor my resources, I install node_exporter to all instances during the initial setup using Ansible, and then I use Prometheus to scrape these metrics. I visualise the gathered data using Grafana. Node exporter is just one type of metrics I gather using Prometheus. A lot of applications expose their metrics in a Prometheus-compatible way, including Traefik and Authelia. Authelia, for example, exposes how many authentication attempts occurred, both successful and failed.
Another tool I use for monitoring is Uptime Kuma, a tool that monitors uptime. It performs requests using HTTP to see if a service is up, checks if a TCP connection can be established, validates DNS records and many many more checks. It also supports a “push” monitor type which supports sending in status updates for something like a cron job to make sure it continues to execute. With Uptime Kuma I’m monitoring the uptime and latency between my routers, some websites I’m currently operating, my main servers (Larissa, Patra and Amorgos) and of course, using the push monitor, verify that syncing from TrueNAS to Backblaze actually works.
Finally, system logs are gathered using Fluent-Bit, that also gets installed in every host and virtual machine using Ansible, and they are sent to Loki for storing and querying them. Logs are stored on the monitoring machine currently, just as Prometheus metrics.
Layer 5 - Application layer⌗
In this layer, we dive into the topmost layer of my homelab, the Application Layer, where most of the user-facing services are deployed and accessed. I’ll provide a list with the applications we use the most and a brief explanation of them. Unless specified other wise, all services are deployed as Docker containers using docker-compose. When a service needs a database, I prefer to run it as a container as well, and persist its data alongside the application data. This way, I can treat applications as stacks, and I’m able to move, backup and restore them as a whole.
The most important service I host is Home Assistant. It is the glue of my smart devices inside the house and when it’s down you can immediately feel the consequences. Home Assistant is an amazing project, with integration for every device and manufacturer you can image. I prefer to run it in a virtual machine using the Home Assistant Operating System, and it is completely managed by Home Assistant, removing the burden to maintain both Home Assistant and the underlying istance.
The second most important project I can’t live without is Nextcloud. My partner and I rely on it as a file synchronisation server, essentially serving as a remote storage drive for all our documents, photos, and videos, ensuring convenient access on the go. Additionally, given the backup procedure I follow, it provides a secure place for preserving important files.
A Jellyfin instance is also available in the homelab for managing and streaming media. It supports transcoding with hardware acceleration (and I’m using the integrated Intel GPU) so it allows you to watch your favourite media in almost every device.
To make it user-friendly for my non tech-savvy partner, I use WikiJS. Within it, I’ve created articles that guide her in using the homelab’s services effectively. This ensures she can navigate and utilise our homelab autonomously, even when I’m not available to assist.
Additionally, I help flightradar24 increase it’s coverage in my area by self-hosting a ADS-B receiver, sharing the gathered data with them. This runs in a virtual machine using a RTL2832 tuner for data acquisition.
Previously, I hosted my git repositories locally using Gitea. Concerned about accessibility in disaster recovery scenarios, where my local repositories would be inaccessible (as they might be affected by the disaster), I decided to migrate them to Github. Lately, though I’m fond of the idea of experimenting with Gitlab and all the built-in DevOps features they offer.
Finally, all these services are presented in a very nice and friendly dashboard with https://github.com/bastienwirtz/homer
My plans for the future⌗
And of course, apart from the currently running applications and services, I have a bucket of things I want to deploy and try on my setup.
I think it would be a nice to have a remote VS Code server to act as my development machine. This way, I would have only one place to setup and configure, accessible from everywhere I am. It could also act as an Ansible and Terraform master, where every playbook and state changes would be initiated from there.
I also want to completely Terraform my homelab, starting from my routers, my switches and continuing to Proxmox and the cloud providers I’m using. For example, I found a Terraform provider for RouterOS and made some experiments. But it needs a more serious time investment from my side if I want to cover my whole homelab.
It is also necessary to have my git repositories backed up, because currently I’m relying on the local copies I have in a couple of workstations and on Github. Gickup sounds like a tool that does what I need and it will add my repositories to my backup procedure.
I also lack a VPN server that runs inside my home network, giving me direct access to it. Instead, I’m relying on the router I have in Linode, which works great, but adds unnecessary latency. I am considering utilising plain Wireguard or use a service like Tailscale
Finally, I want to further secure and audit access to all of my instances. I didn’t think of it until I stumbled upon this awesome service called Teleport which does exactly that. It provides a centralised point to access Linux and Windows machines and also Kubernetes clusters. Every action is logged and can be uploaded to S3-compatible storage. I’m considering fully hosting it on my Raspberry Pi cluster that currently sits idle.
In conclusion, my homelab is the place where I experiment with new applications and technologies. I also have services that I rely on and I try as much as possible to keep them separated from my experiments, as their availability is crucial for my quality of life. So, like many other homelabs, mine is a perpetual work in progress, constantly evolving and adapting to new experiments and technologies.